Transport Layer Security
App Transport Security (ATS)
App Transport Security (ATS) enforces best practices in the secure connections between an app and its back end. ATS prevents accidental disclosure, provides secure default behavior, and is easy to adopt.
ATS is defined in the Info.plist file, under the NSAppTransportSecurity key.
% /usr/libexec/PlistBuddy -c ‘Print :NSAppTransportSecurity’ Info.plist
Dict {
	NSAllowArbitraryLoads = true
}
There are several options for further configuring ATS, also as keys in the Info.plist file. Here is the summary:
| Key | Descripion |
|---|---|
| NSAllowsArbitraryLoads | If set to Yes/True, then ATS is effectively disabled allowing transfer over unencrypted HTTP. On iOS 10 and above, this setting is ignored and will default to No/False, if any of these keys exist: NSAllowsArbitraryLoadsForMedia, NSAllowsArbitraryLoadsInWebContent, NSAllowsLocalNetworking |
| NSAllowsArbitraryLoadsForMedia | If YES, disables all ATS for media loaded from the AV Foundation framework |
| NSAllowsArbitraryLoadsInWebContent | If YES, disables all ATS restrictions on content loaded into an instance of UIWebView |
| NSAllowsLocalNetworking | If YES, removes ATS protections for connections to unqualified domains and to .local domains without disabling ATS for the rest of your app |
| NSExceptionDomains | ATS exceptions for specific domains |
| NSIncludesSubdomains | If YES, applies the NSExceptionDomains ATS exceptions to all subdomains |
| NSRequiresCertificateTransparency | If YES, requires a valid, signed Certificate Transparency timestamps |
| NSExceptionAllowsInsecureHTTPLoads | If YES, allows insecure HTTP loads but does not change TLS requirements |
| NSExceptionRequiresForwardSecrecy | Overrides the requirement that a server support perfect forward secrecy (PFS). If NO, then it will allow ciphers which do not support PFS |
| NSExceptionMinimumTLSVersion | String value that specifies a minimum TLS version for network connections. Valid values: TLSv1.0, TLSv1.1, TLSv1.2, TLSv1.3 |
For more information on configuring App Transport Security, see the following article from Apple:
Packet Capture
There are some scenarios where you will be required to capture the packets for evaluation. This can happen if you are unable to bypass certificate pinning, or otherwise are unable to intercept HTTP traffic. Additionally, some apps choose not to use HTTP for their communications which prevents our intercept proxy from seeing that traffic.
Setup a Packet Capture
IMPORTANT NOTE: Apple has changed the location of the rvictl tool.
macOS Mojave (and earlier): /usr/bin/rvictl
macOS Catalina (and later): /Library/Apple/usr/bin/rvictl
-
Connect the iOS device to the Mac.
-
Launch the Terminal.
-
Create the virtual interface on the Mac
% rvictl -s $(idevice_id -l) -
The previous command should have created a
rvi0interface that is visible from anifconfig -
Start the tcpdump capture on the newly created interface
% sudo tcpdump -n -i rvi0 -s0 -w filename.pcap -
On the iOS device, launch and use the app as normal.
-
Once complete, you can destroy the virtual interface that was created
% rvictl -x $(idevice_id -l) -
Process the PCAP file in Wireshark.
Capturing TLS Keys from an App
Capturing and using TLS keys is nothing new, as Wireshark (and tshark) can use these keys to decrypt a packet capture. This process is specific to capturing these keys from iOS applications. There are two ways we can do this; dynamically with Frida or automated with an iOS tweak. Each have their own pros and cons, and I leave it up to you on which to use.
Start the Packet Capture
You can run the tcpdump command on your macOS system and capture the traffic from the device using a remote virtual interface:
-
Attach the device to the Mac
-
Start the remote virtual interface for the device
% rvictl -s $(idevice_id -l) -
Start the packet capture
% sudo tcpdump -n -i rvi0 -s0 -w appname.pcap -
Launch the Frida script for the app
Dynamic -- Frida
Due to some offsets needed in the script, there is a script available for iOS 13 / 14 / 15 on GitHub.
-
Download the appropriate Frida script based on major iOS release
-
With the packet capture running, launch the Frida script for the app
frida -U -l ios13-tls-keys.js -f com.app.name --no-pause -o appname.keylog -
Note: The
-foption with the bundle ID will ensure that the application is spawned (or respawned) to ensure instrumentation starts immediately -
Use the app as you normally would
-
When finished, exit out of Frida
-
Stop the packet capture
Automated -- Tweak
In iOS, a tweak is a set of instructions that override a function in an application (or the device) to make it do something it was not designed to do. I have ported the code from the Frida script above to a persistent Tweak. All of the current offsets have been included in a single Debian package which is hosted on GitHub.
-
Copy the package to the device
-
Install the .deb file
dpkg -i io.stinger.stealtlskeys_14.0-1+debug_iphoneos-arm.deb -
With this package installed, all apps and device functions will be captured. The keylog file will be written to the application
Data/Documentsdirectory. (e.g.,/private/var/mobile/Container/Data/Application/{UUID}/Documents/StealTLSKeys.keylog) -
To remove the tweak:
dpkg -r io.stinger.stealtlskeys
Wireshark
Once you have the pcap, open it in Wireshark and feed it the TLS keylog file.
-
Open the pcap file in Wireshark, from the Terminal
open example.pcap -
Open the Wireshark Preferences from the menu (Wireshark Preferences...)
-
Select Protocols TLS
-
In the "(Pre)-Master-Secret log filename" section, browse for the
keylogfile save by Frida above and click OK to close out the Preferences window
-
-
In the Wireshark Display Filter, enter
http or http2and press Return to filter those packets only -
The packets will be decrypted and displayed for you
Convert to HTTP in Burp Suite
If your intercept proxy is working, then you can easily test to see if the back-end host will allow you to downgrade the HTTPS connection to an insecure HTTP.
-
Setup your Burp Suite intercept proxy
-
Configure the device to use the intercept proxy
-
Launch the app, and utilize some of the functions that will generate HTTPS traffic
-
Send one of the HTTP Requests to the Burp Repeater
-
In the Repeater tab, enable the "Convert HTTPS links to HTTP"
-
Send the Request, and see if the app functions the same
Keyboard Caching
Generate text within the application, and then review the dynamic keyboard cache using strings or similar tools. Review all the .dat files since each iOS app can implement their own custom keyboards, which may store the cache in a different file.
Change to the /var/mobile/Library/Keyboard/ directory. Run a find for all .dat files:
cd /var/mobile/Library/Keyboard/
find . -name \*.dat -exec strings {} \;
This will find the .dat files and run the "strings" command on the resulting files to check for sensitive information disclosure.
On your test device, ensure that you have keyboards enabled to capture Predictive text, Spell Check, Auto-Correction, etc. This setting is found in "Settings => General => Keyboards"
Additionally, prior to testing, it is a good idea to "Reset" the keyboard cache, so that you know you are starting from a fresh point. With many apps using similar credentials, this will help in ensuring any findings are related to the current app.
Go to "Settings => General => Reset => Reset Keyboard Dictionary". This will delete all keyboard cache files.
Apple System Logs (ASL)
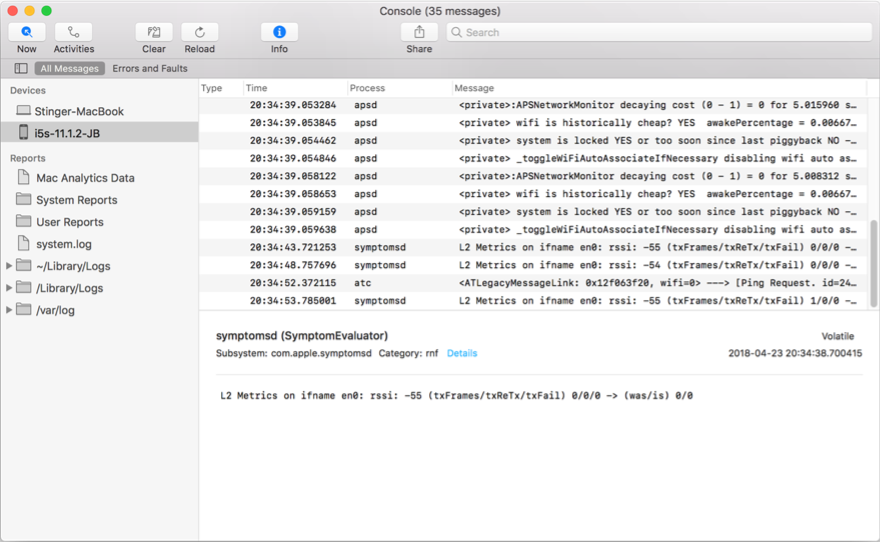
It is surprising the number of times a mobile app logs the actual credentials you use to login to the app to the device syslog facility. The easiest way to review the logs is to use the iOS Console on your Mac, with the device connected via the USB cable. The app allows you to filter the output down to your app.
iOS Log Console
To view the system log on the device, connect the device via the USB cable. Launch the Console application on the Mac (Applications --> Utilities --> Console). Select the device from the left side, under the section labeled "Devices". You can use the Search bar in the top right to filter the log.
idevicesyslog
If you have installed the libimobiledevice package (which you should have), then you can also use the idevicesyslog command on the Terminal to review the ASL from the device.
% idevicesyslog
[connected]
Jan 17 15:39:18 locationd[5332] <Notice>: MotionCoprocessor,startTime,664144758.214144,motionType,1,youthType,0,youthTypeReason,0
Jan 17 15:39:18 locationd[5332] <Notice>: Current state of Workout Predictor: 0
Jan 17 15:39:18 locationd[5332] <Notice>: os_transaction created: (<private>) <private>
Jan 17 15:39:18 locationd[5332] <Notice>: @WifiLogic, handleInput, System::CoarseMotion

. . . (truncated output)
This will produce the log of everything that the device is logging, which will likely be unusable due to the volume. Instead, we should pipe that output to grep to only get our target applications logs:
% idevicesyslog | grep -i cydia
SBLayoutRolePrimary = <SBDeviceApplicationSceneEntity: 0x28353df40; ID: sceneID:com.saurik.Cydia-default; layoutRole: primary>;
Jan 17 15:39:34 SpringBoard(FrontBoard)[5349] <Notice>: Creating process for executionContext with identity: application<com.saurik.Cydia>
Jan 17 15:39:34 SpringBoard(FrontBoard)[5349] <Notice>: Created <FBWorkspace: 0x2821fc6e0; application<com.saurik.Cydia>>
Jan 17 15:39:34 SpringBoard(FrontBoard)[5349] <Notice>: Bootstrapping application<com.saurik.Cydia> with intent foreground-interactive
Jan 17 15:39:34 runningboardd(RunningBoard)[5321] <Notice>: Acquiring assertion targeting application<com.saurik.Cydia> from originator [daemon<com.apple.SpringBoard>:5349] with description <RBSAssertionDescriptor| "FBApplicationProcess" ID:5321-5349-3109 target:application<com.saurik.Cydia> attributes:[

. . . (truncated output)
iOS Backups
iOS has a backup feature that copies the data on the device to either the host computer or iCloud. The backup functionality is initiated from iTunes (up to macOS Catalina) or from the Finder (from macOS Catalina and newer). The backup may include sensitive data that is on the device, and this should be checked at various stages of your testing.
For user installed iOS applications, everything in the Documents/ directory and the Library/Application Support/ directory are automatically backed up by default. These directories are in the application Data directory. While these are included by default, the developer may exclude specific files from the backup using the NSURLIsExcludedFromBackupKey: method. Additionally, the use of the Data Protection APIs could be implemented to further restrict a file from being included in a backup. (See the Data Protection procedures for more information).
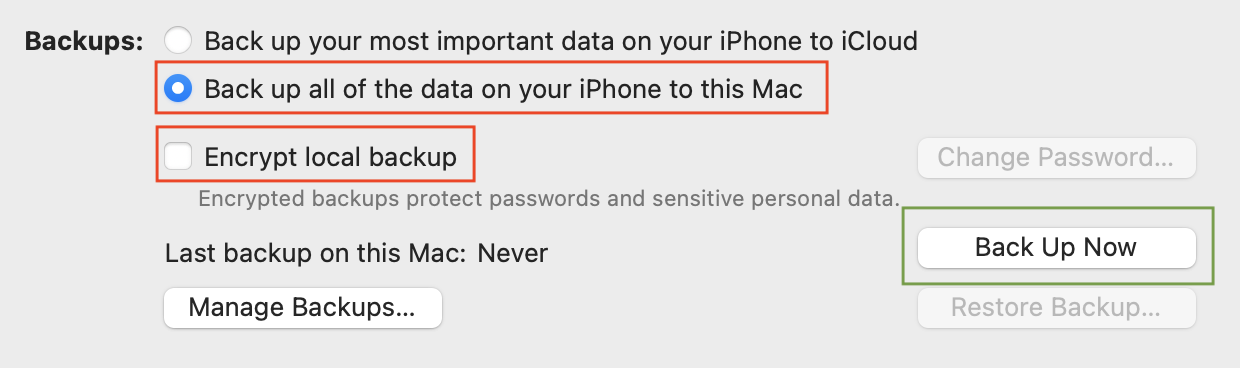
Creating A Backup
We need to create a backup of the device before we can test for sensitive data exposure. At this point, I assume everyone has upgrade to macOS Catalina or newer. So, I will show the Finder method of taking a backup!
- Connect your device to the macOS system
- Open Finder
- The device will show up under the ‘Locations’ section
- If this is the first time connecting, you will have to enable the trust to create the pairing record
- Select the device in Finder
- The device screen will appear. Select the General tab if not already selected
- In the middle, there is a Backups section
- Select “Back up all of the data on your iPhone to this Mac
- For now, ensure that the “Encrypt local backup” option is not selected
- Click the “Back Up Now” button
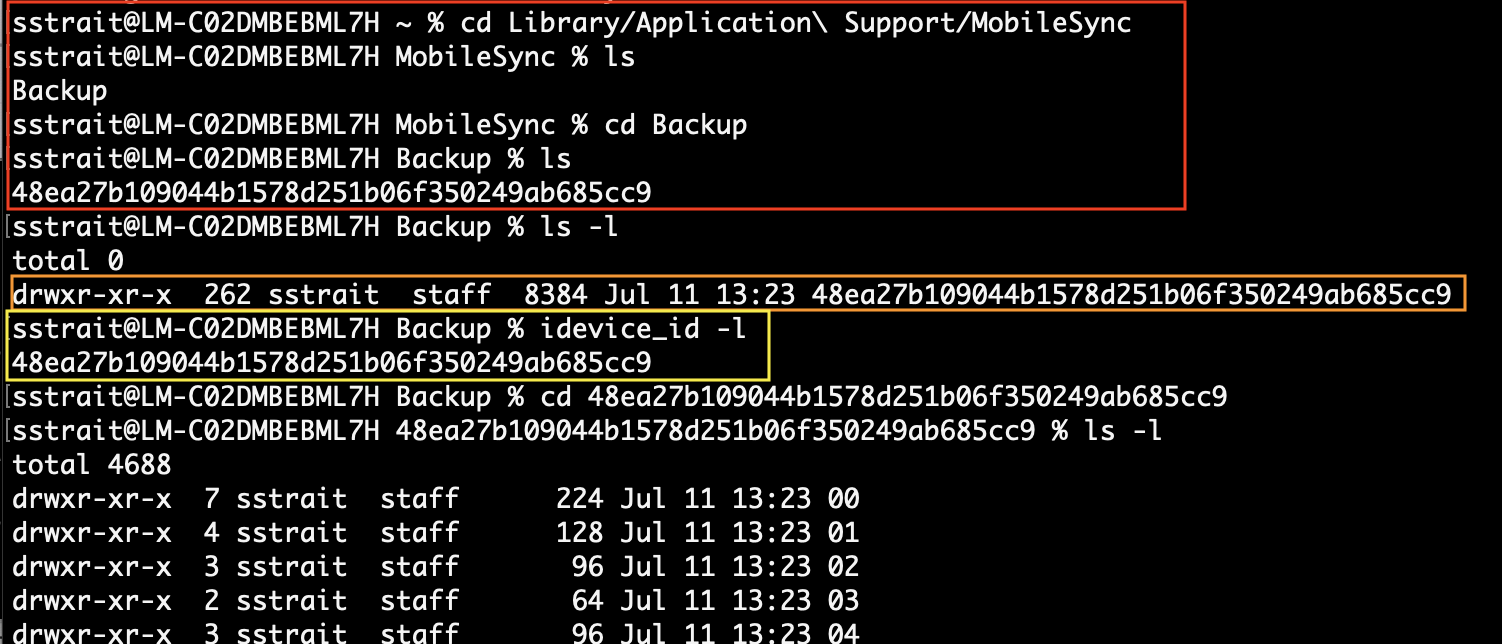
The backup will be stored at the following location in your $HOME directory:
~/Library/Application Support/MobileSync/${UDID}
To get the ${UDID} of the device, run the command: idevice_id -l
Backup Directory Access
If you attempt to change into that directory from the Terminal app, you may encounter the following issue:

This is not a permission issue, as the MobileSync directory will be owned by you:
drwxr-xr-x 3 steve staff 96 Jan 5 2022 MobileSync
The issue is that the Terminal application does not have access to these directories. To get around this, you will need to apply some additional Privacy settings. Open the System Preferences on the Mac:
- Go to Security & Privacy
- Select the Privacy tab
- Click the pad lock in the lower left (and enter your password) to unlock the preferences
- In the left pane, select “Full Disk Access”
- In the right pane, select the Terminal application that you are using
- You may need to click the “+” button and add the application if it does not already exist
- You will be required to quit and re-launch the Terminal app
You will be able to go into the Backup directory:
Review Backup Files
In true Apple fashion, they store the backup files in an odd, esoteric format. However, for our purposes, there are a few ways we can see which files from the app are included in the backup. In the backup directory you will find many sub-directories consisting of two (2) characters. Additionally, there are some PLIST files and a Database.
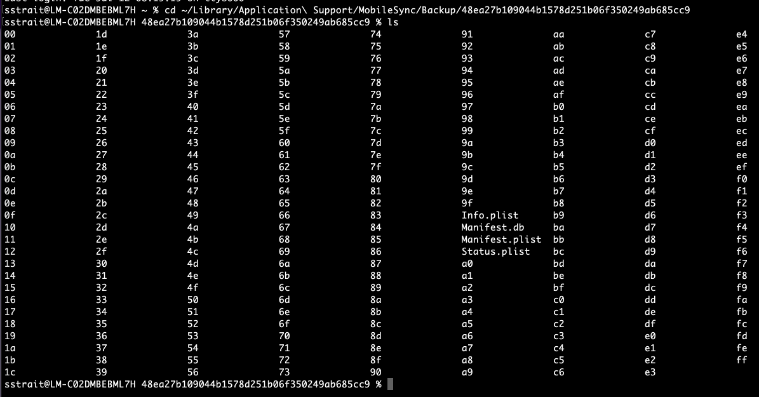
First, we will check to ensure that backup is not encrypted:
% /usr/libexec/PlistBuddy -c 'Print :IsEncrypted' Manifest.plist
false
Next, check that your application was included in the backup:
% /usr/libexec/PlistBuddy -c 'Print :Installed\ Applications' Info.plist
Array {
    io.stinger.dvia2
    com.example.appname
    io.stinger.uncover
}
If the app is included in the backup, get a listing of the files that are included in the backup:
% sqlite3 Manifest.db "SELECT relativePath FROM Files WHERE domain LIKE '%com.example.app%'" | sort -u
We need to understand how the Manifest.db database is storing this information first. We can get this from the database schema.
% sqlite3 Manifest.db ".schema"
CREATE TABLE Files (fileID TEXT PRIMARY KEY, domain TEXT, relativePath TEXT, flags INTEGER, file BLOB);
…
| Column | Description |
|---|---|
fileID | the primary key which appears to be a hash of something… |
domain | the backup domain such as AppDomain |
relativePath | the file path and name |
flags | the flags used to store the file |
file | A PLIST of the filename’s metadata |
Viewing the files that are stored in the backup is not a straight-forward process. But for our purposes we can get a good idea of the data in the files.
For instance, let’s say that the Cookies file is present in the backup at Library/Cookies/Cookies.binarycookies. We can get the fileID of that file from the Manifest.db database and then run strings against it.
% sqlite3 Manifest.db "SELECT fileID FROM Files WHERE domain LIKE '%com.example.app%' AND relativePath LIKE '%Cookies%'"
b686664633b48b87039bb4844031cbf92b8722d4
46ad03aaf24c35e671d1ba6a12453be616935408
This returns two (2) locations where the Cookies.binarycookies file for our app could be stored. To view these files, use the following directory structure:
The returned location looks like this: 46ad03aaf24c35e671d1ba6a12453be616935408
Use the first two (2) characters as the directory, then the full string as the filename.
% strings 46/46ad03aaf24c35e671d1ba6a12453be616935408
cook
Asso.godaddy.com
akm_lmprb-ssn
0aPNHuBZshuZMDqcGTizyWISgppRWS4UQjditgKKDFBrIkDntcSlIxlKgll2YIinSIRbBL7JK7x0hhvO87sSFQChQUzQ7QOhXhRmb7GO4ruycRYoOuFFlnsjw9i5XEA0tzno
Asso.godaddy.com
akm_lmprb
0aPNHuBZshuZMDqcGTizyWISgpplIxlKgll2YIinSIRbBL7JK7x0hhvO87sSFQChQUzQ7QOhXhRuKTdcKh2puMgmb7GO4ruycRYpOxppDvRoOuFFln5XEA0tzno
Depending on the data, you may need to use other ways to see the data.
% xxd 46/46ad03aaf24c35e671d1ba6a12453be616935408
00000000: 636f 6f6b 0000 0003 0000 01f2 0000 0085  cook............
00000010: 0000 0389 0000 0100 0200 0000 1400 0000  ................
00000020: 0501 0000 0000 0000 f100 0000 0000 0000  ................
00000030: 2500 0000 0000 0000 3800 0000 4800 0000  %.......8...H...
00000040: 5600 0000 5800 0000 0000 0000 0000 0000  V...X...........
00000050: 0000 80c8 f13e c441 0000 8008 493e c441  .....>.A....I>.A
00000060: 7373 6f2e 676f 6461 6464 792e 636f 6d00  sso.godaddy.com.
00000070: 616b 6d5f 6c6d 7072 622d 7373 6e00 2f00  akm_lmprb-ssn./.
00000080: 3061 504e 4875 425a 7368 755a 4d44 7163  0aPNHuBZshuZMDqc
00000090: 4754 697a 7957 4953 6770 7052 5753 3455  GTizyWISgppRWS4U
000000a0: 0000 0389 0000 0100 0200 0000 1400 0000  ................
000000b0: 7463 536c 4978 6c4b 676c 6c32 5949 696e  tcSlIxlKgll2YIin
000000c0: 5349 5262 424c 374a 4b37 7830 6868 764f  SIRbBL7JK7x0hhvO
000000d0: 3837 7353 4651 4368 5155 7a51 3751 4f68  87sSFQChQUzQ7QOh
000000e0: 5868 5275 4b54 6463 4b68 3270 754d 676d  XhRuKTdcKh2puMgm
000000f0: 6237 474f 3472 7579 6352 5970 4f78 7070  b7GO4ruycRYpOxpp
00000100: 4476 526f 4f75 4646 6c6e 736a 7739 6935  DvRoOuFFlnsjw9i5
00000110: 5845 4130 747a 6e6f 00ed 0000 0000 0000  XEA0tzno........
If you want to view the file metadata that is stored in the Manifest.db, you can look at it this way:
% sqlite3 Manifest.db "SELECT writefile('cookie.plist', file) FROM Files WHERE fileID='46ad03aaf24c35e671d1ba6a12453be616935408'"
This will produce a file called cookie.plist in the current directory. To view it:
% plutil -p cookie.plist
{
  "$archiver" => "NSKeyedArchiver"
  "$objects" => [
    0 => "$null"
    1 => {
      "$class" => <CFKeyedArchiverUID 0x600001408180 [0x7ff85c3b2d80]>{value = 3}
      "Birth" => 1657559697
      "Flags" => 0
      "GroupID" => 501
      "InodeNumber" => 1430558
      "LastModified" => 1657559697
      "LastStatusChange" => 1657559697
      "Mode" => 33188
      "ProtectionClass" => 3
      "RelativePath" => <CFKeyedArchiverUID 0x6000014081a0 [0x7ff85c3b2d80]>{value = 2}
      "Size" => 1643
      "UserID" => 501
    }
    2 => "Library/Cookies/Cookies.binarycookies"
    3 => {
      "$classes" => [
        0 => "MBFile"
        1 => "NSObject"
      ]
      "$classname" => "MBFile"
    }
  ]
  "$top" => {
    "root" => <CFKeyedArchiverUID 0x6000014080a0 [0x7ff85c3b2d80]>{value = 1}
  }
  "$version" => 100000
}
Remove Backups
Since the backups that we created were not encrypted, they should be removed – especially if sensitive data was found. Make sure to keep any artifacts that you need for reporting, and if desired zip the backup into an encrypted archive.
Encrypted zip file (with device attached to Mac):
% zip -er backup.zip ~/Library/Application\ Support/MobileSync/Backup/${idevice_id -l}
Enter password:
Verify password:
  adding: 61/ (stored 0%)
Remove backup:
- Open Finder and select the device
- On the General tab, select “Manage Backups…”
- Select the Device backup, and click on the “Delete Backup” button
iOS Local Server
Generally, iOS would not have an app that has an active service (listener) running on it. However, it is possible that an app is running its own web server in order to serve up content by a reverse proxy. This is rare, but does happen. During a penetration testing engagment, you should look to see if the app accepts incoming connections.
Determining if the app is running as a server, check the ports that the device is listening on before the app is launched and then again after.
# netstat -an | grep -iw listen
tcp46      0      0  *.49785                *.*                    LISTEN
tcp4       0      0  127.0.0.1.27042        *.*                    LISTEN
tcp4       0      0  *.22                   *.*                    LISTEN
tcp6       0      0  *.22                   *.*                    LISTEN
tcp4       0      0  *.62078                *.*                    LISTEN
tcp6       0      0  *.62078                *.*                    LISTEN
Run the same command after starting up the iOS app:
# netstat -an | grep -iw listen
tcp46      0      0  *.8080                 *.*                    LISTEN
tcp4       0      0  *.8080                 *.*                    LISTEN
tcp46      0      0  *.49785                *.*                    LISTEN
tcp4       0      0  127.0.0.1.27042        *.*                    LISTEN
tcp4       0      0  *.22                   *.*                    LISTEN
tcp6       0      0  *.22                   *.*                    LISTEN
tcp4       0      0  *.62078                *.*                    LISTEN
tcp6       0      0  *.62078                *.*                    LISTEN
We can see from the output after starting the app that there are two new entries (one for TCPv4 & one for TCPv6) running on port 8080.
We can also see that the service listening on port 8080 is bound to all interfaces on the device, as evident by the asterick in front of the port:
*.8080
*.8080
Essentially, anyone on the same network as the device - either Wi-Fi or Cellular - would be able to craft a request to send to the device (app) which would be accepted.
While there is a very good chance this port is from our app (since it showed up after starting it), let's validate that to make sure:
# lsof -i :8080
COMMAND  PID   USER   FD   TYPE             DEVICE SIZE/OFF NODE NAME
AppName  2256 mobile    6u  IPv4 0xf8555c5c0d2a31b9      0t0  TCP *:http-alt (LISTEN)
AppName  2256 mobile    7u  IPv6 0xf8555c5c0d28ef79      0t0  TCP *:http-alt (LISTEN)
From the output, we can see that the service is listed as http-alt and the command is AppName (which we will say is the name of our app).
Next, place the app in the background and see if the listening port goes away or if it is still persistent on the device. You will want to understand how the app behaves and the exposure of that port.
For good measure, let's run an nmap scan on it to verify that it accepts the requests. In the example below, 192.168.0.179 is the IP address of the device on a Wi-Fi network.
% sudo nmap -sS -p8080 192.168.0.179
Starting Nmap 7.93 ( https://nmap.org ) at 2022-09-11 15:38 EDT
Nmap scan report for 192.168.0.179
Host is up (0.081s latency).

PORT     STATE SERVICE
8080/tcp open  http-proxy
MAC Address: B2:27:89:70:89:89 (Unknown)

Nmap done: 1 IP address (1 host up) scanned in 0.19 seconds
Once we are confident that the app we are testing is the source of the listening port, take a look at the frameworks & libraries that the app is using to see if you can determine which package is implementing this behavior.
Typically, these will be in the Bundle/Frameworks directory for the app on the device.
# the app bundle in /private/var/containers/Bundle/Application/{UUID}/AppName.app
cd ${BUNDLE}

cd Frameworks
ls -l
Common Ports
| TCP Port | Service |
|---|---|
| 22 | sshd |
| 1080 | socks |
| 1083 | ansoft-lm |
| 8021 | intu-ec-client |
| 27042 | frida-server |
| 49202 | rapportd |
Memory Dumps
There are many applications and scripts available to dump the process memory. The easiest way is to use the Fridump tool.
fridump
Connect your iOS device to the Mac via the USB cable.
-
Run frida-ps to get the exact name of the app you are testing.
% frida-ps -Uai -
Run fridump against the mobile app.
% python3 fridump.py -U 'AppName' -
This will dump all of the memory regions associated with the app. The files will be named something like
0x1a7400000_dump.dataand will be binary files. You can run the strings command against these files, or instructfridumpto perform this step for you.Command Options:
-ooutput directory-s(automatically run the strings command against the output files)-U(connect to the device over the USB cable) -
The
strings.txtfile will also be stored in the output directory that was specified. Review that file for sensitive information.
Attack Vector
Be careful what you report from the memory dump. If an attacker gets physical access to a device, and that device is not already jailbroken, then the attacker will not be able to access memory contents. To jailbreak the device requires a complete restart of the device, which will clear any active memory pages.
Memory Search using Objection
If you want to search memory for a specific string, then you can use Objection. It will allow you to search memory, show you the offset address where the string was found, and then allow you to dump that information out.
% objection -g 'Example App' explore

exampleapp on (iPhone: 12.4) [usb] ## memory search steve --string
Searching for: 75 33 38 37 39 33 32
11179fb03  75 33 38 37 39 33 32 00 00 00 00 00 00 10 f4 99  steve.........
11179fb13  b2 01 00 00 00 00 00 00 00 00 00 00 00 01 00 00  ................
11179fb23  00 01 02 00 00 00 00 00 00 00 00 00 00 00 00 00  ................
Pattern matched at 1 address
exampleapp on (iPhone: 12.4) [usb] #
If you want to dump the memory address where the data was found:
exampleapp on (iPhone: 12.4) [usb] ## memory dump from_base 0x11179fb03 1024 username.bin
Dumping 1.0 KiB from 0x11179fb03 to username.bin
Memory dumped to file: username.bin

exampleapp on (iPhone: 12.4) [usb] ## !strings username.bin
Running OS command: strings username.bin

steve
https://host.exampleapp.com/ExampleApp/ds/users/STEVE
content-type: application/json;charset=UTF-8

exampleapp on (iPhone: 12.4) [usb] #
Memory Dump -- Objection Style
Objection can also be used to dump all memory segments allocated to the running process. Keep in mind that this process sometimes kills the app when it accesses the memory segments.
exampleapp on (iPhone: 12.4) [usb] ## memory dump all appMemoryDump
Will dump 569 rw- images, totalling 859.6 MiB
Dumping 512.0 MiB from base: 0x280000000  [####################################]  100%
Memory dumped to file: appMemoryDump

exampleapp on (iPhone: 12.4) [usb] ## !ls appMemoryDump
Running OS command: ls appMemoryDump

appMemoryDump

exampleapp on (iPhone: 12.4) [usb] #
At this point, you can run strings against the output file (which will be in binary format) and review the information that it contains.
% strings appMemoryDump > appMemoryDump.txt
memscan
In some cases, the app under test could implement some anti-frida code to prevent the Frida client attaching to the running process on the device. In this case, both fridump and Objection would fail to dump the memory since they both rely on Frida.
So, I have included memscan in the Jailbreak Utilities package, and it should be available at /jbutils/usr/bin/memscan on the device. Memscan is a memory scanner which uses mach_vm* to either dump memory from a process or search for a specific sequence of bytes.
iPhone:~ root# memscan
 __   __  _______  __   __  _______  _______  _______  __    _
|  |_|  ||       ||  |_|  ||       ||       ||   _   ||  |  | |
|       ||    ___||       ||  _____||       ||  |_|  ||   |_| |
|       ||   |___ |       || |_____ |       ||       ||       |
|       ||    ___||       ||_____  ||      _||       ||  _    |
| ||_|| ||   |___ | ||_|| | _____| ||     |_ |   _   || | |   |
|_|   |_||_______||_|   |_||_______||_______||__| |__||_|  |__|

Author: Grant Douglas (@Hexploitable)
Blog: https://hexplo.it
Version: 1.4-dirty

Usage:
-------
Verbose mode: -v
Dump memory to a file: memscan [-p <PID>] -d [-o <outputFile>]
Search memory for a sequence of bytes: memscan [-p <PID>] -s <INPUT_FILE>
Dump Process Memory with Memscan
The simplest thing to do is to dump the entire memory region of the process. This will be a fairly large, binary file that you will need to process using the 'strings' command. File sizes of 1.5 gigabytes are common with memscan.
In the example below, we will dump the memory regions of the application with PID 7388. You can use the 'ps' command on the device to get the correct PID for your specific application.
iPhone:~ root# memscan -p 7388 -d
 __   __  _______  __   __  _______  _______  _______  __    _
|  |_|  ||       ||  |_|  ||       ||       ||   _   ||  |  | |
|       ||    ___||       ||  _____||       ||  |_|  ||   |_| |
|       ||   |___ |       || |_____ |       ||       ||       |
|       ||    ___||       ||_____  ||      _||       ||  _    |
| ||_|| ||   |___ | ||_|| | _____| ||     |_ |   _   || | |   |
|_|   |_||_______||_|   |_||_______||_______||__| |__||_|  |__|

Author: Grant Douglas (@Hexploitable)
Blog: https://hexplo.it
Version: 1.4-dirty

Progress: 100%
Finished.
Dump written to: memscan_output_7388.bin
In this case, we did not specify the "-o" flag, so it used the default output file naming convention.
As mentioned before, and evident from the file extension, this is a binary file. So, use the strings command to process it to a readable version that you can then search.
iPhone:~ root# strings -n 6 memscan_output_7388.bin >> memscan7388.txt

iPhone:~ root# grep -Ei ‘steve|P@ssw0rd’ memscan7388.txt
You can also search the binary file if you really want to. But your search string must be in hexadecimal form. Use the xxd command to dump the hex output of the file.
iPhone:~ root# xxd memscan_output_7388.bin | grep '\x45\x78\x61\x6d\x70\x6c\x65\x41\x70\x70\x0a'

00dc0b00: 0057 656c 6c73 2046 6172 676f 2041 6476  .ExampleApp Adv
00dc0b20: 0057 656c 6c73 2046 6172 676f 2054 6865  .ExampleApp The
00dd01a0: 0057 656c 6c73 2046 6172 676f 2041 6476  .ExampleApp Adv
00ddf3e0: 0057 656c 6c73 2046 6172 676f 204d 6f62  .ExampleApp Mob
In the above example, I used the search string of \x45\x78\x61\x6d\x70\x6c\x65\x41\x70\x70\x0a which is hex for "ExampleApp". The output shows the offset in memory, and the strings.
sidebar_position: 8 hide_table_of_contents: true
Filesystem Monitoring
Monitoring the file system is a good way of determining which files the app is writing to or reading from as it is being used. Reviewing the file system activity may point you to PLIST files or databases that you can review for sensitive information. Performing this tracing can easily be accomplished using the 'fsmon' utility.
The first thing we will do is launch fsmon specifying the app we want to trace. Then we will launch the app on the device, so that we can gather all file system activity from start to finish.
Note: Make sure that the application is completely killed off - double press on the Home button and kill the app.
fsmon -P $BINARY
In some instances, you may only want to capture file system activity while performing a specific task. To do this, you will need to get the process ID of the running app you are testing using the ps -ef command.
To trace the process file system activity:
fsmon -p 1234
(Where 1234 is the process ID you want to monitor)
In many cases, Apple APIs are called from the app which are spawned and handled outside of the parent process ID. If you trace only the process ID or the binary name then you may miss some critical activity. It is recommended that you also trace the BUNDLE and DATA directories of the app as it is in use.
# Bundle Directory
fsmon /private/var/containers/Bundle/Application/${UUID}/AppName.app

# Data Directory
fsmon /private/var/mobile/Containers/Data/Application/${UUID}/
sidebar_position: 10 hide_table_of_contents: true
Keychain Protection
iOS can use the Keychain APIs to store sensitive data, such as session tokens, or passwords. The Keychain is a SQLite database on the device that can only be accessed through the Keychain API's.
In iOS, the Keychain file is located at /private/var/Keychains/keychain-2.db
There are four Keychain API's that an app can use:
-
SecItemAdd
-
SecItemUpdate
-
SecItemCopyMatching
-
SecItemDelete
You can see if these APIs are in use by searching through the header files dumped from the executable binary, or by simply running the strings command against the executable binary of the application.
% grep -riI SecItem $HEADERS
% strings $BINARY | grep -i SecItem
Items stored in the Keychain can also have accessibility protections set for each entry. This determines how the data in the keychain entry can be accessed, whether it can be copied into a backup, or even transferred to a new device. Data protection for the Keychain items is set by using the kSecAttrAccessible key to SecItemAdd or SecItemUpdate.
There are several values that the kSecAttrAccessible key may have:
-
kSecAttrAccessibleAlways
-
kSecAttrAccessibleAlwaysThisDeviceOnly
-
kSecAttrAccessibleAfterFirstUnlock
-
kSecAttrAccessibleAfterFirstUnlockThisDeviceOnly
-
kSecAttrAccessibleWhenUnlocked
-
kSecAttrAccessibleWhenUnlockedThisDeviceOnly
-
kSecAttrAccessibleWhenPasscodeSetThisDeviceOnly
In addition to accessibility protections, Keychain items may also have access control protections. These are set through the kSecAccessControl keys.
-
kSecAccessControlDevicePasscode
-
kSecAccessControlBiometryAny
-
kSecAccessControlBiometryCurrentSet
-
kSecAccessControlUserPresence
Any keys that are secured by biometrics (Touch ID or Face ID), are protected by the Secure Enclave Processor (SEP). In these cases, the Keychain does not hold the actual value of the key. Rather it holds a token that can be used to query SEP to obtain the actual key. This query will require you to provide a valid biometric authentication to obtain the key.
Dump Keychain with Objection
Objection has a built-in way to dump the Keychain entries for the running application.
-
Start Objection and connect to the application
% objection -g 'AppName' explore -
Use the ios specific command to dump the Keychain (
ios keychain dump)com.company.appname on (iPhone: 14.0) [usb] # ios keychain dump -
You can also dump the Keychain entries out to a file in json format by adding
--json filename.jsoncom.company.appname on (iPhone: 14.0) [usb] # ios keychain dump --json keychain_dump.json
Note: You may be asked to authenticate using the devices passcode or TouchID
Dumping the iOS keychain...
Writing keychain as json to keychain_dump.json...
Dumped keychain to: keychain_dump.json(Note the entry for any biometrics keys)
-
The data is written into
keychain_dump.jsonfile in the current directory. You can review it from within Objectioncom.company.appname on (iPhone: 14.0) [usb] ## !cat keychain_dump.json
Running OS command: cat keychain_dump.json
[
{
"access_control": "None",
"accessible_attribute": "kSecAttrAccessibleWhenUnlockedThisDeviceOnly",
"account": "skillet-secure-storage",
"alias": "",
"comment": "",
"create_date": "2020-09-28 13:45:44 +0000",
"creator": "305406738",
"custom_icon": "",
"data": "",
"dataHex": "2df8a9f0ed4e8ba3da0fcfbf26xcx82c81b4acca9233d8xcx77c173fxcxfa4ba",
"description": "",
"entitlement_group": "4X5S3X9XX8.com.company.appname",
"generic": "",
"invisible": "1",
"item_class": "kSecClassGenericPassword",
"label": "",
"modification_date": "2020-09-28 13:45:44 +0000",
"negative": "",
"protected": "",
"script_code": "",
"service": "domain_key_1",
"type": "1985500759"
},
etc… -
Review these keys to ensure that proper protections are in place.
sidebar_position: 11 hide_table_of_contents: true
iOS Cryptography Monitoring
Cryptography is crucial to mobile application security since a lot of attacks are based on a threat actor having physical access to the device. Cryptography includes Encryption/Decryption, Hashing, Message Authentication Codes (MAC), Signatures, and Key Derivation Functions (KDF’s).
When testing a mobile app, you need to evaluate the cryptographic algorithms and protocol’s that are in use and evaluate them for weak or insecure configurations. This can be accomplished through source code review, and dynamic analysis.
Weak Algorithms
The following algorithms are known to be weak or insecure:
- DES / 3DES
- RC2
- RC4
- Blowfish
- MD4
- MD5
Monitor Cryptography With Objection
Launch the mobile then run the following command:
objection -g 'App Name' explore
Then, setup the monitoring job:
ios monitor crypto
The output will be similar to this:
objection -g ‘App Name’ explore

Checking for a newer version of objection...
Using USB device `iPhone`
Agent injected and responds ok!

     _   _         _   _
 ___| |_|_|___ ___| |_|_|___ ___
| . | . | | -_|  _|  _| | . |   |
|___|___| |___|___|_| |_|___|_|_|
      |___|(object)inject(ion) v1.11.0

     Runtime Mobile Exploration
        by: @leonjza from @sensepost

[tab] for command suggestions
com.example.app on (iPhone: 14.8) [usb] #
com.example.app on (iPhone: 14.8) [usb] # ios monitor crypto
(agent) Registering job 956086. Type: ios-crypto-monitor
com.example.app on (iPhone: 14.8) [usb] #
With the monitoring job running, login to the mobile app and use the app as a normal user would. When the app encounters a crypto function that is hooked, it will display the information on the terminal screen.
In some cases, the app may use a third-party cryptography package instead of the default Apple API’s. In these cases, you will need to determine which library is used, and research the best way to monitor those methods. If the Objection monitoring does not show any entries, look for an alternate library. Having no encryption or hashing in a mobile app is very unlikely.
sidebar_position: 12 hide_table_of_contents: true
Data Protection
iOS and iPadOS leverage an API called "Data Protection" which is used to encrypt and protect each individual file of the app. The encryption keys are stored in the Secure Enclave Processor (SEP).
Data Protection Classes
Data Protection Classes:
| Class | API Name |
|---|---|
| Class A: Complete Protection | NSFileProtectionComplete |
| Class B: Protected Unless Open | NSFileProtectionCompleteUnlessOpen |
| Class C: Protected Until First User Authentication | NSFileProtectionCompleteUntilFirstUserAuthentication |
| Class D: No Protection | NSFileProtectionNone |
For detailed information on each of these classes, see Apple's Security Guide:
https://support.apple.com/guide/security/data-protection-classes-secb010e978a/web
Dynamic Analysis Testing
Using Frida, we can interrogate the running the application to determine the Data Protection class of every file in the application. There is a Frida script available on BitBucket to assist with the evaluation.
-
Run Frida with the "
-l" option and pass theios-data-protection.jsscriptfrida -U -l ios-data-protection.js -f com.example.app -
Once Frida is connected to the app, and the script has been injected, run the
getDataProtectionKeysForAllPaths()function[iPhone::Mobile]-> getDataProtectionKeysForAllPaths() -
This function will produce a lot of input, as it will evaluate every single file associated with the application
% frida -U -l iosDataProtection.js -F
     ____
    / _  |   Frida 12.11.17 - A world-class dynamic instrumentation toolkit
   | (_| |
    > _  |   Commands:
   /_/ |_|       help      -> Displays the help system
   . . . .       object?   -> Display information about 'object'
   . . . .       exit/quit -> Exit
   . . . .
   . . . .   More info at https://www.frida.re/docs/home/
[iPhone::Mobile]-> getDataProtectionKeysForAllPaths()
[
    {
        "fileProtectionKey": "NSFileProtectionNone",
        "path": "/private/var/mobile/Containers/Data/Application/7A2A3930-A2A4-4F8B-B162-3DC35E5FA59B/StoreKit/receipt"
    },
    {
        "fileProtectionKey": "NSFileProtectionCompleteUntilFirstUserAuthentication",
        "path": "/private/var/mobile/Containers/Data/Application/7A2A3930-A2A4-4F8B-B162-3DC35E5FA59B/Documents/FSCalendar.fid"
    },

etc… -
Evaluate the output to determine if the established Data Protection class is appropriate for the file type that is displayed.
-
If the file contains data, such as PLIST's or SQLite databases, then there should be a protection class set.
-
If the files are benign, such as images, receipt, etc., then not having a Data Protection class set is fine.
-
sidebar_position: 13 hide_table_of_contents: true
Review App Session Cookies
On you are logged into the mobile app, a session is established from the back-end server. This cookie data could be stored in a Cookies.binarycookies file or kept in the Keychain. Along with the session ID, this will also contain the cookie attributes, such as HTTPOnly & secure (among others).
Review Session Information with Objection
Launch the app and login, then run the following command:
objection -g 'App Name' run 'ios cookies get --json'
The output will be similar to this:
[
    {
        "domain": ".example.net",
        "expiresDate": "null",
        "isHTTPOnly": "true",
        "isSecure": "true",
        "name": "SESSIONID",
        "path": "/",
        "value": "kAiVksIPXmaxZo/7Hx+X4mcuT3DwRlZ3SbonOEL12zZ6OUHH+l1ipCwpKlNFzC/PGreClpwttpr0
. . . (truncated) . . .
sidebar_position: 14 hide_table_of_contents: true
App Snapshots
When the user presses the Home button on the iOS device, it places the current app in to the background. To give the illusion of re loading the app to the foreground, iOS will take a snapshot image of the running app. When the user re-opens the app, iOS loads this stored image first while it really loads the app in the background. Once the app is fully open, the image disappears, and the user never knows the difference.
If the user presses the Home button while the app is displaying sensitive data, then that sensitive data is captured in the image and stored locally on the device. Look for these images and review them for sensitive information.
App: $DATA_DIR/Library/Caches/Snapshots/<subdirs>
System: /private/var/mobile/Library/Caches/Snapshots
sidebar_position: 15 hide_table_of_contents: true
HTML Caching
Almost every iOS app communicates to a web server to perform transactions such as authentication, or data retrieval. Apple makes setting up these connections fairly easy for the Developer by providing the NSURLRequest API to handle HTTP requests. Unfortunately, this API will cache the HTTP requests and responses by default leaving them on the device.
Cache.db
This cache of HTTP communications can usually be found in the applications' DATA directory which is typically ${DATA}/Library/Caches/appID/Cache.db. The "appID" directory is typically the bundle ID of the app (i.e., com.company.appname). The Cache.db file is a standard SQLite database. There may also be Cache.db-wal and Cache.db-shm files alongside the main database file. These are the "Write Ahead Log" and "Shared Memory" files that are used in SQLite and can safely be ignored for our purposes.
The Cache.db is usually located in the following directory:
${DATADIR}/Library/Caches/${BUNDLEID}/Cache.db
As mentioned, the Cache.db file is a standard SQLite database that contains 4 tables of data. For our purposes, only 3 of these tables are of interest. By using the '.tables' command in sqlite3 we can get a list of the tables in the database.
$ sqlite3 Cache.db
SQLite version 3.12.1 2016-04-08 15:09:49
Enter ".help" for usage hints.
sqlite> .tables
cfurl_cache_blob_data       cfurl_cache_response
cfurl_cache_receiver_data   cfurl_cache_schema_version
The first table is called "cfurl_cache_blob_data", and as the name implies this table holds Binary Large OBject (BLOB) data containing the response from the server. As the name suggests, we will not be able to view this data in the sqlite3 command. We could run strings on it to see much of the data, but there is a better way. This BLOB data turns out to be simple Property List (PLIST) files which are common on iOS devices. So, we can easily export the BLOB data from the database, and then use the plutil command to view the data.
The next table is "cfurl_cache_response", and contains the data requested and the response in standard text making it easy to review. There is also a field in this table called "isDataOnFs". If this column has a "1", then this information (request/response) is also stored in another folder on the iOS device within the Caches folder of the app. Typically, this directory is called fsCachedData and can be reviewed with the strings command.
The last table is "cfurl_cache_receiver_data", and this contains data received from the server in response to the cfurl_cache_response. This is also simple text data so it is easy to review.
Database Export
The sqlite3 command on the iOS device is a great tool to perform simple actions on the database. However, it is not sufficient to properly dump the BLOB table from the database. So, the best thing is to copy the Cache.db from the device to your Mac to fully dump the database out to text files.
The "cfurl_cache_response" and "cfurl_cache_receiver_data" tables are easy to dump from the database:
sqlite3 $1 "SELECT * FROM cfurl_cache_response" >> cache_response.txt

sqlite3 $1 "SELECT * FROM cfurl_cache_receiver_data" >> cache_receiver_data.txt
The "cfurl_cache_blob_data" is a bit more complicated to export. Each column of each row contains BLOB data. So, we have to dump each one individually, and write them to a text file. So, to start we must determine how many rows the table has, and then loop through each row to dump the data.
To find out how many rows the table has, and assigning it to a variable for the loop, can be done as follows:
ROWS=$(sqlite3 Cache.db "SELECT COUNT(*) FROM cfurl_cache_blob_data")
Then we run the loop to dump the data out of each column in each row:
for i in $(seq 1 ${ROWS})
 do
   sqlite3 $1 "SELECT writefile('${TMPDIR}/response_data_$i.txt', response_object) FROM cfurl_cache_blob_data WHERE entry_ID = '$i'" >> /dev/null

   sqlite3 $1 "SELECT writefile('${TMPDIR}/request_data_$i.txt', request_object) FROM cfurl_cache_blob_data WHERE entry_ID = '$i'" >> /dev/null

   sqlite3 $1 "SELECT writefile('${TMPDIR}/proto_props_$i.txt', proto_props) FROM cfurl_cache_blob_data WHERE entry_ID = '$i'" >> /dev/null
done
At this point we have the data dumped out, but it is still in binary mode. So, we have to do a bit more processing of this data to make it plain text. This can be done by using the plutil utility to echo the output into a text file.
for i in `ls response_data_*`
 do
   plutil -p $i >> response_data_all.txt
 done

for i in `ls request_data_*`
 do
   plutil -p $i >> request_data_all.txt
 done

for i in `ls proto_props_*`
 do
   plutil -p $i >> proto_props_all.txt
 done
Now we have all of the data that is housed in the Cache.db SQLite database dumped out to simple text files. The tedious part starts now to identify what data is being cached by the application and see if it is sensitive.
fsCachedData
Depending on how the app is setup, there may also be a directory called "fsCachedData" which contains several binary files of the HTTP cache. This is usually located in the directory below:
${DATADIR}/Library/Caches/${BUNDLEID}/fsCachedData/filename.bin
However, the developer could set this directory up in other places in the ${DATADIR} folder. So, I would suggest searching the entire ${DATADIR} for it.
cd ${DATADIR}
find . -iname fscacheddata
Since the files are binary, use the strings command to review them.
NSURLCache
There could also be an nsurlcache directory which could also hold HTTP cache files. Search for and examine this directory if it exists.
cd ${DATADIR}
find . -iname nsurlcache
sidebar_position: 17 hide_table_of_contents: true
Pasteboard Leakage
Monitor pasteboards while using the application, copying and searching application data.
/private/var/mobile/Library/Caches/com.apple.Pasteboard/*
Some applications will implement a "named" pasteboard which is only available inside the app. This should be tested to see if you can copy/paste data from the app to an app outside of the container.