iOS App Testing on Jailed Devices
Version 1.0 (January 2022)
Introduction
When performing mobile app DAST tests, it is critical to run the app on a jailbroken or rooted device. Given the limited time we have to test an app, the additional access provided by the jailbreak or root of the device allows the tester to spend more time testing the app instead of trying to bypass common defenses.
However, jailbreaks and rooting of mobile devices has become much more sophisticated over the years. Apple has taken an aggressive stance on securing the iOS environment with additional kernel level checks during runtime. As we continue to move forward with these security enhancements, the visibility into the functions of the device and its apps gets smaller. To continue moving the DAST Mobility program forward, we have been looking for additional ways to accomplish the tasks needed for a thorough assessment. Ironically, the future of mobile testing may lie in falling back to the old method of library injection.
Frida
Frida is dynamic runtime code instrumentation toolkit. It allows you to inject small snippets of JavaScript code to interact with the mobile app. It works on a fairly wide range of operating environments, though this document focuses only on iOS.
Frida contains a robust set of APIs that you can interact with using your own scripts. Additionally, there are several tools that are already built on top of Frida that use these API's which will significantly reduce the spin up time on its use.
One of these tools is Objection. Using Objection, and some additional Frida scripts, we can accomplish much of the same dynamic testing that we can do while on a jailbroken/rooted device. This method should only be used when you do not have a jailbroken/rooted device. While it does take a little longer to perform the analysis, it is better than not being able to test at all or leaving defects on the app.
Gadget Library
For jailed devices, Frida can be run as a dynamic library. Frida calls this library a "Gadget". Essentially, we will inject this Gadget into the mobile app so when the app runs it will also cause our Gadget to run. We can then interact with the Gadget, which will have access to the app sandbox.
The Objection toolkit provides us an easy way to perform this library injection, and also performs many of our dynamic tests.
Jailed iOS Devices
As mobile apps continue to store and process more sensitive data, some developers are taking a hardline approach to jailbreak detection. This improves the overall safety of the data on the device, but sometimes makes penetration testing the app much more difficult. Recently, we have experienced apps that will execute this detection so early in the app that the app crashes immediately on launch. Other apps have gone so far as to zero out the app executable once it detects that the device is jailbroken. This obviously impacts our ability to evaluate the app to see if bypassing these checks are even an option.
When this type of detection is observed, we have to decide if we can bypass the jailbreak detection through reverse engineering efforts, or if it is simply easier to "root" the application and then run it on a jailed device. Testing on a jailed device typically reduces our visibility in to the app, and limits the active attacks that we would normally perform. However, we can crack open that app to allow more visibility and a wider range of attacks by injecting the Frida dynamic library (called FridaGadget.dylib) into the executable.
To accomplish this, we will copy the library (FridaGadget.dylib) in to the IPA file, and inject a simple load command into the Mach-Object header so that the library is called when the binary is executed. Of course, this causes a few issues:
-
Once we inject the load command, the binary will no longer be signed due to the modification, and iOS will refuse to run it
-
The binary must not be encrypted -- we cannot inject a load command into an encrypted executable
-
The app must be started in debug mode to interact with the Gadget
Fortunately, Apple provides us with the capabilities to re-sign apps with our own certificate. We can even re-sign apps that were developed by someone else.
INTERNAL APPS: If the app is managed by an MDM or MAM solution (i.e., BlackBerry or InTune), then this method will likely fail. Also, if the app implements ptrace detection or any type of binary integrity checks, that could prevent the app from running in debug mode.
Setup
There are a few one-time setup steps that you will need to perform so that this all works. Review the items in the list below, and install any of the packages that you don't already have.
-
Objection (https://github.com/sensepost/objection)
# install frida first:
pip3 install frida-tools

# then install objection:
pip3 install objection -
FridaGadget.dylib (https://build.frida.re/frida/ios/lib/FridaGadget.dylib)
-
Objection will download the latest version automatically
-
You can use the -V flag to specify a certain version of Frida (i.e., to match your device)
-
-
ios-deploy (https://github.com/ios-control/ios-deploy)
-
Simplifies the process of launching the app in debug mode
brew install ios-deploy
-
-
Apple Developer Account (https://developer.apple.com)
-
Provisioning Profile (*.mobileprovision)
-
Code Signing Certificate
-
-
Xcode with CLI Tools (App Store) - use the latest Xcode version
-
Mac computer (since Xcode only runs on macOS)
-
insert_dylib (https://github.com/Tyilo/insert_dylib)
-
Installation:
git clone https://github.com/Tyilo/insert_dylib
cd insert_dylib
xcodebuild
cp build/Release/insert_dylib /usr/local/bin/insert_dylib -
If you encounter an error such as this:
xcode-select: error: tool 'xcodebuild' requires Xcode, but active
developer directory '/Library/Developer/CommandLineTools' is a
command line tools instance
then run the command below:
sudo xcode-select -switch /Applications/Xcode.app/Contents/Developer
-
-
Install Node / nvm
curl -o- https://raw.githubusercontent.com/nvm-sh/nvm/v0.37.2/install.sh | bash

nvm install v15
Obtaining a Decrypted IPA
To perform this action, we need an unencrypted IPA file. If you downloaded the app from an App Store (either Apple or an internal app store), the app may be encrypted. In that case, you must use a jailbroken device to install the app, then pull the decrypted IPA over. You will need to use a jailbroken device that is the same architecture (arm64), but it can have a lower version of iOS installed. The architecture is the critical part.
NOTE: It is recommended to use the same type of hardware to obtain the IPA if at all possible. For instance, if you plan to use the decrypted IPA on an iPhone 7, then try to obtain the IPA from a jailbroken iPhone 7. If you can't, you may need to edit the Info.plist file to add your hardware model. Check this link: https://www.theiphonewiki.com/wiki/Models
Once you have an unencrypted IPA file, you will need to obtain a provisioning profile to use for code signing.
Check UISupportedDevices
Since we are taking an app from one device and installing it on another, we need to validate that the UISupportedDevices key in the Info.plist file contains our jailed device model.
With the device connected to the macOS system via the USB cable, query the device for its hardware model.
ideviceinfo -s | grep ProductType

ProductType: iPhone11,8
The result will be in the format: iPhone11,8 or iPad5,2. In this example I am going to use a hardware model of iPhone11,8.
Extract the IPA file that you have obtained from the jailbroken device. Inside of the Payload/AppName.app directory will be an Info.plist file. Using plutil, query that file for the hardware model.
# extract IPA
unzip -qq appname.ipa

# query the Info.plist file
plutil -p Payload/AppName.app/Info.plist | grep iPhone11,8
If the hardware model is listed in the Info.plist, then move on to the next step. If it is not listed, then open the Info.plist file with Xcode so that you can add it.
Once Xcode opens the file, look for the UISupportedDevices. Expand that array key, and hover the mouse over an entry, then click the "+" button to add a new entry. Add the required hardware model and save the file.
Zip the directory back up so that you have an IPA.
zip -qr appname-updated.ipa Payload/
Sign the IPA
The app must be properly signed to run on a physical device. You must create a valid provisioning profile, and use the developer certificate to sign the app.
Provisioning Profile
If you have a full (paid) Apple Developer account, you can just create a provisioning profile in the Developer Portal (https://developer.apple.com). However, if you have the free Apple Developer account, you will have to jump through a few more steps. But it can still easily be done.
I will note the difference in steps below on the [Full] account versus the [Free] account.
-
On your Mac, launch Xcode (Applications Xcode). Select to "Create a new Xcode project".
-
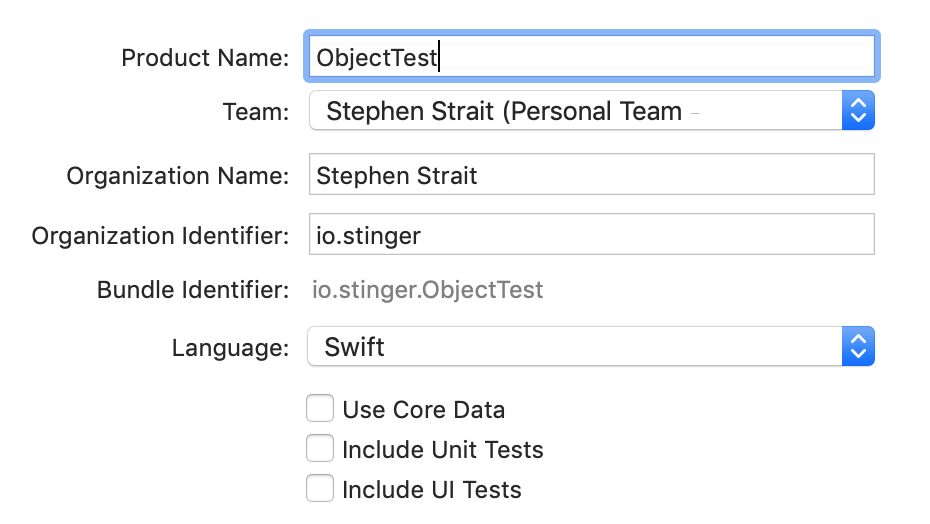
Using the iOS templates, choose to create an App and click Next. Enter a Product Name, select your account under Team, and ensure your Organization Identifier is correct (See below for my example). Click on Next.
-
Select where to save the project, and click on Create.
-
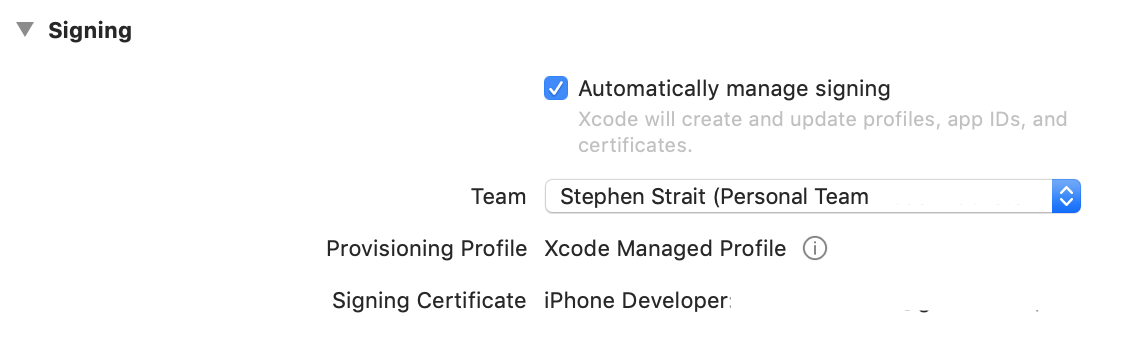
Select "Automatically manage signing" and select your Team.
-
Attach the non-jailbroken device to the Mac via the USB cable. Ensure the device is unlocked, so that you are sitting at the device screen.
-
In the upper left part of Xcode, select to run the app on your device (click the red box below to select your physical device), and then press the Run button (the green box).

-
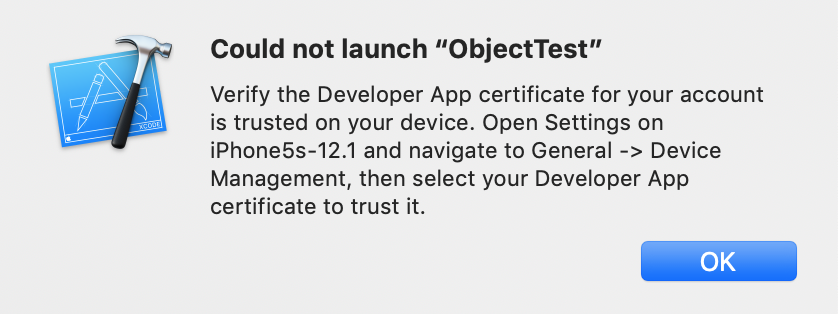
Once you click the run button, the empty app will be deployed to your device.
a. [Free] - If using the free account, you will see an error box pop up that says it cannot launch the app. This is because the free account only has a temporary certificate. To get around this, follow the instructions to Trust the app. On the device, go to Settings General Device Management and tap on the Trust button (you must have Wi-Fi access to do this). Go to step 8.
b. [Free] After you have Trusted the app in step 7a, go back to Xcode and click the Run button again. The app should launch properly this time, since it is now trusted.
c. [Full] If using the full account, your app will launch properly because your certificate is signed by the Apple CA.
d. NOTE: in some cases, the icon for the app does not show up on the device home screen. The app is there, you just can't see it. It is ok for this process.
-
[Free] After you have Trusted the app in step 7a, go back to Xcode and click the Run button again. The app should launch properly this time, since it is now trusted.
-
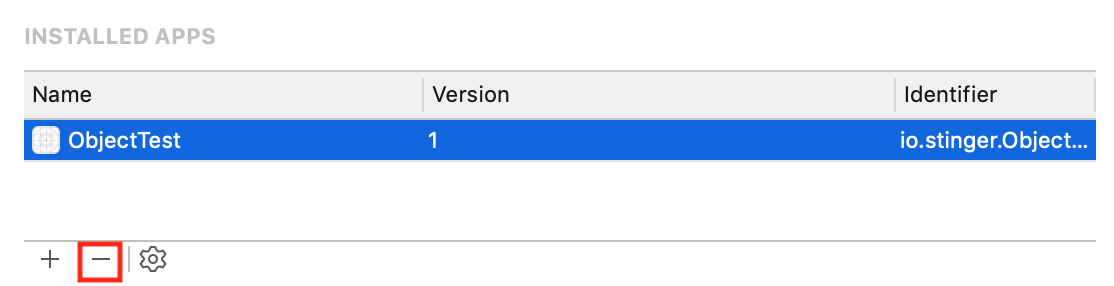
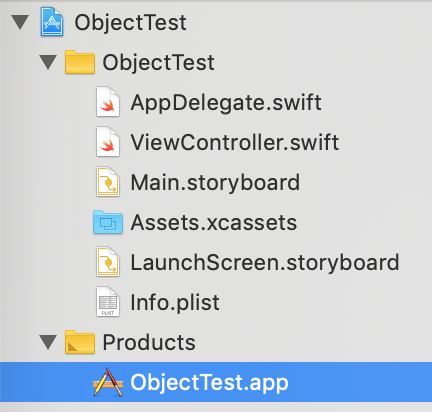
In Xcode, click on Window Devices and Simulators from the main menu at the top. This will open a new window. In this new window, select the app from the Installed Apps section, and click the "-" sign to delete the app.
-
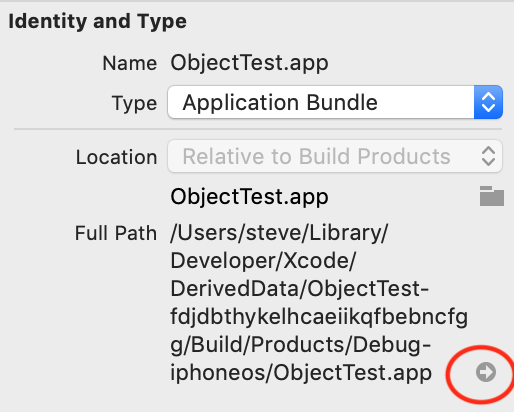
In the main Xcode screen that has the project we created, expand the "Products" entry to show the .app file. Highlight that .app then find the full path under the Identity and Type section on the left. Select the small arrow button after the path to open it in Finder.
-
In the Finder window, you will see the .app directory and a .swiftmodule directory. Right click (Control Click) on the App icon and select Show Package Contents.
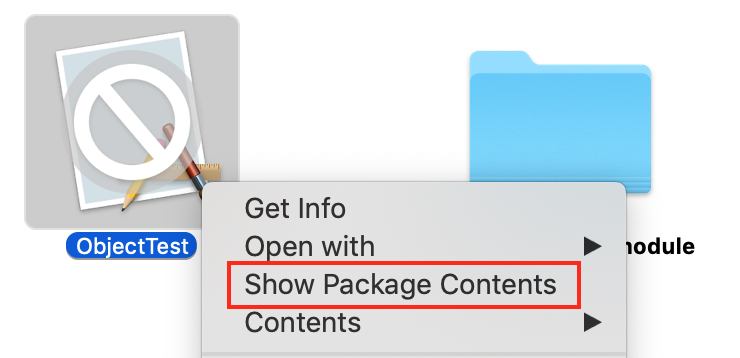
-
Inside that package is a file called embedded.mobileprovision. Save this file out to the Desktop or where ever you like. I usually place it in a directory with the decrypted IPA file.
Code Signing Certificate
The last piece that we need is the SHA-1 hash of our code signing certificate. This certificate should be in your Keychain on the Mac already, since it was imported into Xcode. The easiest way to get this value is to run a command at the Terminal. So, open up a new Terminal window and change to the directory where you have the decrypted IPA and the embedded.mobileprovision file located.
Run the following command:
$ security find-identity -p codesigning -v
1) **9B2338CF777710F1545D777B4CC6E777C0E777F5** "iPhone Developer: Steve Strait (JNRJ9R7D83)"
(Note: That is not my actual certificate value)
[Full] If you have the full developer account, you may have many certificates. Ensure that you select the hash for the certificate that was used with the mobileprovision file. It will fail otherwise.
Patch the IPA
At this point, we have everything we need to patch the IPA with the Frida library. Open a Terminal window if you don't have one already, and change to the directory with the IPA file. You may want to open a couple of Terminal tabs (Command/⌘ - t ).
While you can patch the IPA manually, there is a nice feature in
Objection to help automate this process. The command is built as
follows:
objection patchipa -s {Decrypted IPA} -c {Certificate Hash} -p
{mobileprovision File}
Example:
% objection patchipa -s appname-updated.ipa -c 9B2338CF777710F1545D777B4CC6E777C0E777F5 -P AppName.mobileprovision

Using latest Github gadget version: 12.2.25

Remote FridaGadget version is v12.2.25, local is v11.0.12.
Downloading from:  https://github.com/frida/frida/releases/download/12.2.25/frida-gadget-12.2.25-ios-universal.dylib.xz
Downloading iOS dylib to /Users/steve/.objection/ios FridaGadget.dylib.xz
Unpacking /Users/steve/.objection/ios/FridaGadget.dylib.xz
Cleaning up downloaded archives
Patcher will be using Gadget version: 12.2.25
Working with app: AppName.app
Bundle identifier is: com.wf.mobilebanking
Codesigning 19 .dylib's with signature 9B2338CF777710F1545D777B4CC6E777C0E777F5
Code signing: libswiftCoreImage.dylib
 . . .
Creating new archive with patched contents
Codesigning patched IPA
Cannot find entitlements in binary. Using defaults
Copying final ipa from /var/folders/yp/c1063pbx2hq39xsfrdn04mdr0000gn/T/WellsFargoMobile-frida-codesigned.ipa
to current directoryCleaning up temp files
$
Install & Run Patched Application
To get this all to run properly, we will use the ios-deploy command to install the app on to the device, and launch the app in debug mode which is needed to properly interact with it.
-
First, extract the IPA file that was created in the previous section. It will be identifiable by the "frida-codesigned" text in the file name.
unzip -qq appname-frida-codesigned.ipa -
This will create a Payload/ directory that has our signed app in it.
-
Deploy the app to the device and start the debugserver.
% ios-deploy -b Payload/AppName.app/ -d
[....] Waiting for iOS device to be connected
[....] Using 70059c09467e208a4151408430be786156591ce1 (N51AP, iPhone 5s (GSM), iphoneos, arm64) a.k.a. 'iPhone5s-12.1'
------ Install phase -----
[ 0%] Found 70059c09467e208a4151408430be786156591ce1 (N51AP, iPhone 5s (GSM), iphoneos, arm64) a.k.a. 'iPhone5s-12.1'
connected through USB, beginning install
. . .
(lldb) connect
(lldb) run
success -
Once you have reached the "success" line in lldb, the app has been deployed to the device. You will see that lldb spawn's the app for you, and it will be a black screen for a few minutes. However, the Gadget is running at this point, so go to another Terminal tab and launch Objection to connect to the Gadget.
objection -g Gadget explore -
You can now use Objection (or Frida) to interact with the application as it was running on a jailbroken device. Keep in mind that sandboxing still applies, so you can only work with this application.
Reconnecting to the App
Once you have deployed the app, as we did in the previous section, you won't need to perform the deploy again for subsequent interactions with the app. The app is installed, and will stay that way. So, when coming back to an app and reconnecting to it, run the following command:
ios-deploy -m -b Payload/AppName.app/
This will launch the app on the device, but will not install the app again.
Note: If you try to launch the app directly on the device, it will appear to hang. After about 20 seconds, the app will crash! This is a feature in iOS prevent an app from locking up the entire device while it tries to load. To get past this, connect to the app with Frida or Objection:
# launch the app on the device
# then connect to it with Frida - before the 20 second timeout
frida -U -F
The app will run normally from there - even if you disconnect Frida.